60W CO2 Laser: 3 Months In
January 29, 2021
Blog
About 3 months ago I got a new laser cutting and engraving machine.
After having access to it for some time, I really think it’s a great tool. That being said there has still been a setup learning curve–namely getting my filtration correct. In this post I’ll outline a bit more about my journey so far, its ease-of-use, and what I’ve made. I’ll also touch on what I still plan to do with it!
Filtration, Filtration, Filtration
As mentioned in my first laser post, I purchased an 80W fume extractor setup and extra ducting for around $250. The price has apparently gone up since then, and as it turns out, it doesn’t suck as much air in as I was hoping.
The good news is that the laser itself did come with a blower, with no filtration, which extracts air much better. However, I wasn’t keen on having a plume of smoke emanating from my garage in a rather suburban neighborhood, so I set up my own pre-filter system for it that uses standard 12x12 household HVAC filters.
The new device is very simple, just several slabs of 3/4” MDF glued together to form a box, with the filter in the middle to catch excess fumes. Air is sucked through the filter before it hits the blower, giving it the apparent bonus of slowing gunk buildup on the blower itself. I wouldn’t trust this to exhaust into my garage, so the fumes are still piped out of my workspace. That being said, it still seems to extract the majority of visible smoke and pulls out about 4x as much air as before, so I’d call this a definite win.
STL files for the 3D-printed adapters I used are found on GitHub, and the structure was designed on CAD. Ultimately, however, I haphazardly assembled it using available materials, as seen in the clip below:
While we’re on the subject of fumes, there are certain materials you shouldn’t cut. Here’s a list from Cleveland Public Library, and another from Dallas Makerspace. Number one on both lists is PVC, which emits “pure chlorine gas when cut!” Seriously, don’t mess with the stuff.
Ease of Use
Once your filtration system is in place, it’s quite easy to use. After using a CNC router, the big difference is that there is little to no fixturing to worry about. It’s a tough concept to wrap your head around if you’re used to the traditional CNC world, but consider that instead of a cutter, all your machine doing is passing light over it. That being said, for low-weight materials, like card stock, neodymium magnets can be used to lock things down on the grate, keeping them from being blown around by the laser’s air exhaust.

(Image Credit: Jeremy Cook)
I’m using LightBurn control software, which is also easy to use. With it plugged in to my home network via Cat6 cable, I can take the notebook out to my garage and control the laser wirelessly from wherever I see fit. Part of the reason “lasering” is comparatively easy versus a CNC router is that you don’t have do deal with different cutters and depth-of-cuts. While that’s a bit of a simplification, as there are certain subtleties needed to get your process working really well, there’s not as much danger of catastrophically crashing your tooling.
Things I've Made - Things to Try


(Acrylic Christmas light holders worked much better than the cardboard prototypes - Image Credit: Jeremy Cook)
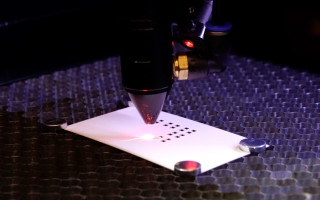
So far I’ve made a few things with the laser, much of it with cardboard. It’s a great material, and practically free in our age of boxes being constantly delivered to your door. For cutting, I’ve found that a speed of 40mm/s and 60% power generally works pretty well, with marking at 100mms/ and 12% power.
1/8 inch acrylic also cuts nicely, but is more expensive, and MDF and other types of wood are on the list to try. I’ve found that old business cards also cut quite well, which I’ve used to make solder stencils for small PCBs, based in part on info found here.
Other interesting potential future experiments could be creating different power scale tests based on this form–though 100% power may actually be too much for my laser to handle based on ammeter readings. Plycutter, by Tuomas Lukka, “Takes a 3D model in an .stl file and generates 2D .dxf files suitable for laser cutting, with generated finger joints between material sheets where appropriate.” Also a cool idea that could open up laser possibilities significantly.
While I’m not going to give up my 3D printer or other tools any time soon, having a laser should give me all kinds of new options. I’m excited to see what I can build with it in the future!